Thursday, 31 December 2009

Change Label Width Dynamically

Ok so in the last exercise we clicked the button on the form, this then:

1) Calculated the form size at that moment
2) Set the label size to be in the form with equal distance between the start and end of the label with repsect to the form edges.
3) Wrapped the text to fit.

Now the limitation was that if you moved the form's width with your mouse the label width would stay the same and so you wouldn't see the ends of the wrapped text as you decreased the form width.

1) To make this a dynamic setting take the code from the button click event and copy it to a text editor (Word, Notepad etc).
2) Delete the code
3) Go to the code window and in the top left drop down menu pick (frm1 events)
4) In the right hand drop down pick the resize event
5) In the event handler for the resize event paste the code you copied from the button click event.
6) Take out (cut) the line where you populate the label and paste it into the button click event.
7) Save and run the application

So your click event should only have this code in it:

lbl1.Text = "I am populating the label with some text now.... and I am typing more text here to increase the width of the string beyond the width of the screen. This is to show how the label can be wrapped so that it does not print off the screen."

Your resize event should have this code in it:


Can you see in the very last line of code that a new drawing size is being created and put in the lbl1.maximumsize property? The variable value we used in the original formwidth variable will change as we change the form width

When you run it you should be able to decrease the width of the form and the label text will now shrink or increase to fit, the text line breaks will increase or decrease depending on the width of the form. It will get to a point where, if you are decreasing the width of the form to such as extent, the height of the form, which is fixed, will not be able to expand to contain all the text and it will be pushed out the bottom of the form.

Label Being Decreased to Small Width (Note the label text wrapping to fit). Any smaller than this width and the text will start to be pushed off the bottom of the form.


Label Being Increased to Large Width(Note the label text increasing to fit):


What usually happens is a form will have many controls on it and the designer will want to contain the amount the user can decrease the width. We could stipulate a minimum size for the width so that it never went below this. Height will usually be static.

Wrapping Text in a Label

Previously I showed you how to dynamically increase a form's width to take into account a control size being increased - such as the label - to hold a longer string of text. We discussed that this had a limitation that if the string font was very large (unlikely) or the string was very long then the string would write off the page if the length of the control (label stretching with long string in it) and the distance from the label to the left of the form was longer than the PC screen itself.

A solution to this is to tell the code to wrap the text in the label if it gets to the end of the screen maximum [determined] size and still needs to write out more of the string. What you can also do is set a size limit for the label and have it wrap when it gets to that size. This is the more likely option that would be used so lets do that.

Please note any old code will be commented out and a space left between it and new code I am writing. If you see code commented out just ignore it and concentrate on the work being done at present.

So what assumptions can be made?

1) The form will not get any bigger than the physical screen size
2) We can limit the size of the label width and then wrap to accommodate more text.
3) The operation will still be triggered by the button click event for now.
4) We may make a routine that can be called from the click event to calculate the length of text etc in further tutorials

So let us do the following:

  • Set an arbritary maximum size for the width of the label
  • Set the code up so that it wraps the text if the length of text string dictates it.
  • Set label property 'AutoSize' to True
1) Let us first comment out the code we have from previous exercises to leave us with just the string of text (in button click event) being put into the label as follows:

lbl1.Text = "I am populating the label with some text now.... and I am typing more text here to increase the width of the string beyond the width of the screen. This is to show how the label can be wrapped so that it does not print off the screen."

Note: I have put in extra text so that the text is much longer than the current form size.

The current form is:

Size = 526, 300

And it will be kept at that for now.

2) Go to the design window for the form. Pull the label over to the left under the button so that both left sides of the button and label are aligned. You will see a blue reference line when they are in line. See screenshot for example:


3) When you run the application then click the button it will calculate the form size at that time and create a label that will fit into it with equal space either side. The code to do this is in the screenshot below:


Please note that some of the code is commented out and some of the previous code I was able to reuse for this exercise. All the code is in the button click event. This will only work for the click event but it lets you see a simple way of wrapping the text in the label to fit a predetermined size i.e. the fixed form size. Remember the text you have to put into the label as above. Here it is again:

lbl1.Text = "I am populating the label with some text now.... and I am typing more text here to increase the width of the string beyond the width of the screen. This is to show how the label can be wrapped so that it does not print off the screen."

Putting this code in the button click event is only for illustration purposes so you can associate what happens through clicking a button. In reality this code would be part of a routine called at maybe different intervals throughout the operation of the code.

For instance if someone was resizing the form then the width would have to be continually recalculated and the label width recalcualted to fit in the moving formsize. Just try resizing the form width now and see what happens to the text.

So check out the next posting if you want to see how to have the label automatically resize as you increase and decrease the width of the form. It's much easier than you think. The hint is you do not need to write any more code, just add a new event handler and do some tweaking.

Wednesday, 30 December 2009

Remeber Your Comments

When you are coding remember to put in comments to explain what your code is doing. This fulfills the following:

1) Anyone else reading your code can get a quick plain English overview of what is happening without the need to study the code.

2) It helps you to document what you have done and by doing this you might notice a mistake you have in the logic of your code through explaining it in plain English

As you can see I have added a list of explanations as to what the code is doing in the screenshot below. The comments are the lines in green:


Remember to put the comments in the appropriate place, don't just list them all at the top of the class. Put comments about a click event in the click event and so on.

Increase Form Size Automatically to Fit Text

You might have a situation with a form where you need to automatically expand it to fit in an expanding label or other controls that vary in size. Sometimes large text strings are put in a wrapping (onto another line below) label but nevertheless this is an interesting bit of work to try as the fundamentals of it can be put too good use in other tasks.

The learning objective here is to learn how to calculate the new size of the form and then apply it. So for instance if I increased the font size in my label it would print of the edge of the form because it is not big enough to fit in the existing form size.

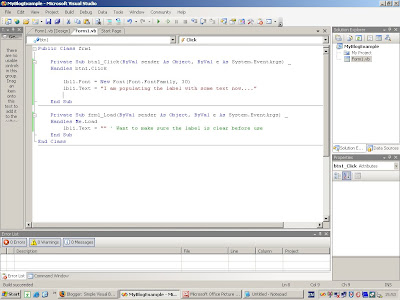
1) So with the previous example lets create a new font size for the message we have put into the label by doing this in the button click event before assigning the text to the label:

lbl1.Font = New Font(Font.FontFamily, 30)

So you are declaring a new font object and assigning it the value of 30. The current value will be whatver the setting is in the properties of the label in the design editor; in this case it is 8.25.

As you can see in the screen shot I have inserted the new line of code before we put in the text to the label.


Run this to see for yourself that the text runs right off the side of the form.

2) Create three variables to:

  • Hold the width of the label once it has been populated with text
  • Hold the X position of the label. This will tell you how far the left side of the label is from the left edge of the form.
  • Hold the new form width required. This will be the addition (+) of the two previous variables.

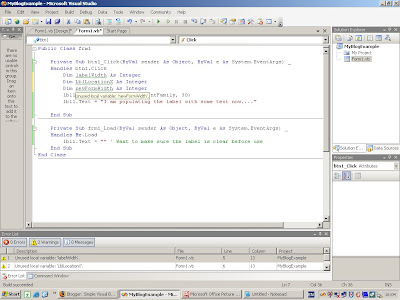
So in your code, just after the event handler code for the button click event declare the new variables as follows:

Dim labelWidth As Integer
Dim LblLocationX As Integer
Dim newFormWidth As Integer

Don't worry about the names too much as long as they tell you what the variable's purpose is. They should be declared as integers because all the values we will be dealing with are integers, and the value being input to the 3rd variable wil also be an integer because it will be the addition of the two first variables.

So as you can see in the screenshot below the variables are now defined. You will get a green squiggly line under the variables and if you hold your mouse to the line it will tell you this is an unused local variable. Do not worry however as you are going to be using then in a minute. This is not anything to worry about.


3) Put the label width in to the variable labelWidth as follows:

labelWidth = lbl1.Width

4) Put the X coordinate label location in the labelLocationX variable as follows:

LblLocationX = lbl1.Location.X

5) Add the two variables (+) you have just populated with values and put the sum of these values into the variable newFormWidth as follows:

newFormWidth = LblLocationX + labelWidth

Just to remind you what you are doing here is you are taking the measurement from the left of the form to the start of the label, you are then taking the label width (when it has the text in it) and then adding these two values. This will give you the new required width of your form to accommodate the large font that has written of the page.

Technically speaking the left side of the form is fixed and all controls on the form will reference from the left side of the form. If the form has to resize then the measurement from the left of the control (label or textbox for instance) to the left of the form can be used as a fixed reference to calculate the new form size required with respect to the increased size of the control you need to accommodate.

6) As you are in the form class, to refer to the form, and to set its width to the new size you type the following:

Me.Width = newFormWidth

7) Save your changes and run the form. You will see the form jump to a size just neat enough to accommodate the new longer label size when you hit the button.

The good thing here is if you move the label a bit further away from the left side where it originally was it will always recalculate and resize your form according to the position of the label. There is however one slight limitation - can you spot it? Answers at the bottom of the page.

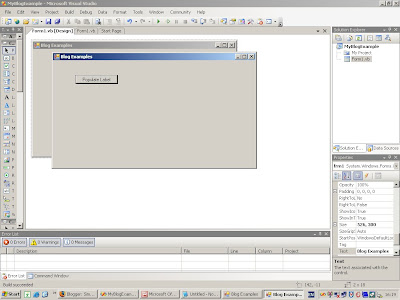
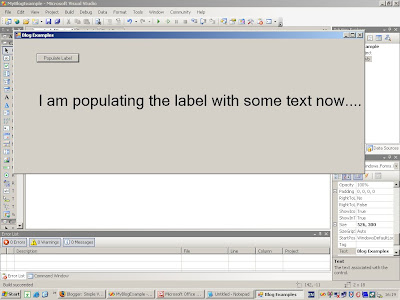
Here is a screenshot of the finished product:

Before label expands:


You can see the label expands here to accommodate the increased length of the label:


So did you figure out the limitation? If you increase the text font ot such a large size that the length of the string is physically bigger than the computer's screen width then it will write off the page. As far as I know there is no simple way to make the form bigger than the screen, I think it is a Windows limitation rather than VB itself. However I will look into this and post a topic if I find out how it is done.

Generally speaking you wouldn't generally find text that big on a form. But if the text string is going to be long then it is probably better to wrap the text in the label. I will post a quick thread on how to do this soon.

Populate Label With Text

So lets populate this label with some text. We know it is going to be clear for us to put in a value as the label is cleared when the form loads. What we need to do is to use the existing btn1 click event and put some code in there. We will use the code as before but with one difference, can you spot it?

lbl1.Text = "I am populating the label with some text now...."

So lets go and put this into the button click event. You can see the new code in the click event and the resulting form at runtime, after we click the button, in the shot below:

A Note on Clearing Labels

When you start to build bigger applications you will maybe be populating a label or other controls multiple times with different values. Each time you finish the operation you will want to clear the form.

Generally what most coders do (What I have learned from looking at experienced coders coding) is that you will maybe create a sub to handle this clearing event. So to clear one form with three text fields and 2 labels you might call this:


'Do something
'End of operation
clearFields() << Call clear routine here


And the bit of code for this routine would look something like:

Private Sub clearFields()

txt1.text = ""
txt2.text = ""
txt3.text = ""
lbl1.text = ""
lbl2.text = ""

End Sub


For simplicity assume this code to be in the form class code.

Tuesday, 29 December 2009

Using form Load Event

In the last post I discussed how you can manipulate a label so that the default text in it is cleared at runtime, in anticipation of using the label for displaying some real messages. Remember we want to try and leave default text in the label so we can see it at design time.

I specified that my preferred option was to clear the text at the form load event. To do this follow the next steps:

1) Copy and paste the small bit of code from the button click event

Note: Anything after a (') is a comment and is not code.

i.e. this: lbl1.Text = "" ' You are making sure the text in the label is empty

2) Go to the code window
3) From the left hand drop down list pick the form events as in the shot below:


4) From the right hand list pick the load event shown Below:


5) Once you pick the load event the event handler will pre-populate the code window with a new event handler as below.


6) put your line of code in the new event handler so that it looks like this:


7) Then run the application again. You will see the label has already been cleared when the form appears.

this is how to clear the label at runtime. it will still show its default text when you open it at design time.

Note: Don't worry about the empty button click event handler it won't do anything when you run the code.