So if you are not using any of the projects from the last example you can create a new form/project with a button on it. There are details to do this here:
To Create a new project
To Add a Form
So once you have done this, or you have opened an existing project you can play about with, do the following:
1) Pull a new button on to the form as shown:
Note: If you have the label control on the form from previous tutorials then remember to check that the button and lable do not line up. We are not going to be activating the label in this exercise but this is good practice to make sure controls don't clash.
2) Give it a text property like 'New Form' without the quotes of course
3) Give the name property a name like btn2
4) Add a new form to the project as below, Right click Project > pick Add > Windows Form:
5) After that you will get an 'Add new item' dialog box with the windows form icon greyed out.
6) All you need to do is keep the name as form2, or whatever is your default, and click add.
7) Once you have the new form, go to form1 designer view and double-click the new button
8) In this click event that you now see, put in the following code:
Form2.Show()
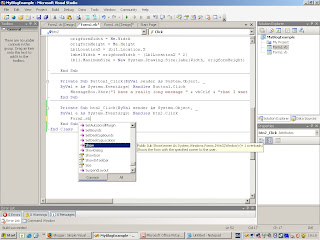
As you type form2. you will be given a list of options to pick from after the dot, if you type s then h after the dot you will see the word 'Show' in the list being matched to what you typed. To select this you can either doubleclick on it or press the tab key. This is shown below:

9) Now all you need to do is save and run the form, then click the new form button and you will see your new form. Simple enough.


No comments:
Post a Comment