Sunday, 29 April 2012

Access Look Through Query Code

Generally I just post topics where I have been doing some research for work and self-learning purposes so today we will look at how to manipulate the SQL code of an Access Database Query and also how to change/view table names in VBA code. While working as an IT developer I had to do the following:

Replicate a database and change all the table names in queries to suit the new requirements; the code was to stay the same but only the data sources were to change.
In this instance a lot of the queries referenced a linked table and so by copying the DB I have to take the old table offline, clear the data and then create a new link to the other table; I cannot use the old table reference.

If you have a local table (not linked) in the Access database and you rename it, the renamed table will appear in all queries that reference it.

So with a linked table even when you delete it it will still appear in the query design, but the query will usually exhibit a "can't represent the join expression between LinkedTable.ID = LocalTable.ID" when you go to design view.

To get round this go into the visual basic editor (Usually tools > macro > visual basic editor in 2003 Access or Developer ribbon > visual basic editor in 2007/10 Access)

Create a new module, or use an existing module and enter the code below to get a taster of what you can do:

Simply create a new subroutine with any name you like - respecting design rules of course


Public Sub TableNamesInQueries()
Dim qdf As QueryDef
Dim sqlCode As String
Dim db As Database
Set db = CurrentDb()

For Each qdf In db.QueryDefs
sqlCode = qdf.sql
MsgBox "Query code = " & qdf.sql
Next qdf

End Sub

So here you can loop through each query and display the code in a mesage box. If you want to manipulate the code and say replace the table name you can use this in place of the message box:

If InStr(sqlCode, "Dates") Then
qdf.sql = Replace(sqlCode, "Dates", "New_Table_Name")
msgbox "New Code = " & qdf.sql
End If

 It is best to put a message box in at first to display your new SQL code so that you are confident that what you are designing is performing exactly the changes you want. Then when you are confident it is correct you can run the code with out performing a check every time.


You can also do a similar bit of code if you want to rename local table names just change it to:


Public Sub tableNames()
Dim tdf As TableDef
Dim tblName As String
Dim db As Database
Set db = CurrentDb()

For Each tdf In db.TableDefs
tblName = tdf.name
MsgBox "Table name = " & tdf.name
Next tdf

End Sub
 You can also exclude tables with system names and also linked tables if you want to only loop through local tables.

To exclude linked tables check for a connection string larger than 0, which is what a linked table will have:

If Len(tdf.connect) > 0 then
'Ignore this table
End if

To exclude system tables and temp tables check for "msys" or "~" characters in the name:

if instr(tdf.name, "~") or instr(tdf.name, "msys") then
'ignore and continue to check other names or process info
end if


Wednesday, 14 March 2012

Using VBA

In Excel for example you can use VB code to manipulate certain things within the rows/columns and objects or even work with external data sources to import data and display it on the sheet. For example here is a simple bit of code to press a button on the sheet, bring up a dialog box where the user inputs a new sheet name and then a log is written in the spreadsheet of when the name was last changed and to what value. Here I am using 2003 Excel.


'New sub routine created with name reflective of the work to be done


Sub ChangeSheetName()


'Define variable to hold input from user


Dim NewName As String


'Firstly populate the variable with the user input then process


NewName = InputBox("Enter the new name of the sheet")


'Check if the variable is empty if so exit the sub
'If the value input by user is not empty then set the active sheet to this value
'Put a line of text in the first cell of the sheet
'then add current date to next cell
'then add the value that the sheet name was set to in the next cell
'in each of those processes do an autofit for the column so that log note
'looks like a sentence


If NewName = "" Then
 Exit Sub
Else
 With ActiveSheet
  .Name = NewName
  .Range("A1").Select
  Selection.Value = "This sheet's name was last changed on the :"
  Columns("A:A").EntireColumn.AutoFit
  Range("B1").Select
  Selection.Value = "=now()"
  Columns("B:B").EntireColumn.AutoFit
  .Range("C1").Select
  Selection.Value = "To: " & NewName
  Columns("C:C").EntireColumn.AutoFit
 End With
End If
End Sub

Wednesday, 2 June 2010

Using Dialog Result

If you are asking the user to confirm or cancel details, say you have a validation check on a textbox for instance, which is a system check to confirm the correct syntax etc is correct, for instance a phone number entered is in the format XXXX XXX XXXX. Now you want to display a message box asking the user to confirm that the number, say 0123 456 7890 is correct, i.e.is this the number you meant to put in?

Do you see the two checks here?:

System check for correct format
User check of actual number entered

No point in doing this the other way round if you see what I mean? That is, ask user to confirm number and then validate the format of it. If the format is wrong then the user input will be wrong anyway, they might have put in a letter instead of a number for instance.

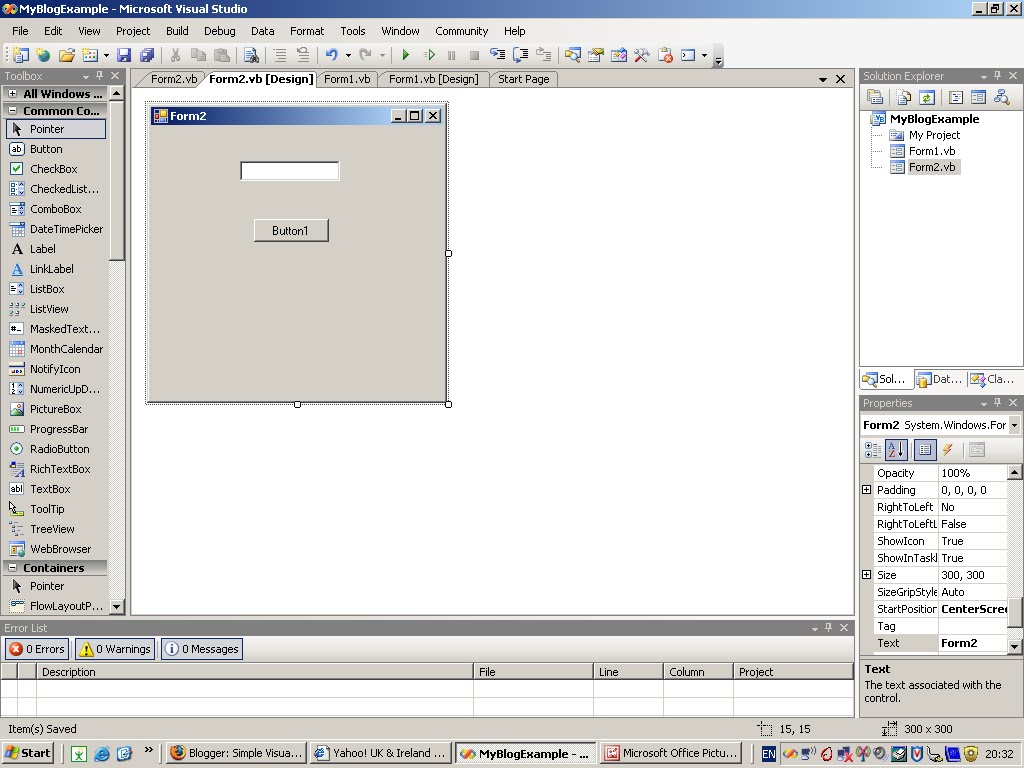
It might be an idea to start a simple VB project with a form and a text box if you don't already have one.Start up your new project as below. Call it anything you want, DialogTest or TestDialog, anything.


So you want to finally ask the user if this is the correct value they have put in before they move on. It can be a pain to be asked these things but many do not understand how useful this type of "interruption" is! It can save so many problems later on down the road.

Put a button and textbox on your form as below:


Now to open your code window while selecting the correct event for the button press action simply double-click the button on the form design. Each control (Button, text box etc) has a default event, in this case the button has a default event ButtonClick. Once you double click you should see something like this in yourcode window:


Note that I have put an underscore at the end of top line on the event handler (The bit between private sub and end sub) and cut the rest of the line down under the top line to see the whole event details. Yours will be all in one line but you can do this too so that it looks neater and you can read it in one screen.

Now declare a variable of type integer. Integer because it will be holding whole numbers like 5, 6, 7 etc Call it what you like but in this case you could use MsgAnswer or similar. Declare it within the button click event as shown:


You will get a squiggly line under the variable or any variable you are not yet using, this doesn't mean an error it just means the variable is unused as of this point.

Now Add a small statement to show a message box (when button is clicked) asking the user if the value they put in the text box is correct. Code like this:

MessageBox.Show("Is the value " & txt1.Text & "  Correct")

Note: your textbox (txt1) may have a different name property so be sure to change that or you will get an error message by copying this line. Default is usually Text1. So if you have not changed it's name in the properties list you would instead put:

MessageBox.Show("Is the value " & Text1.Text & "  Correct")

Can you see the difference?


You can see the final code below for this part of the excercise:


Run this code using the F5 button just to get a feel for what is happening so far. Put in a name and press the button. You will get a small message box with an OK button asking Is the value Correct?

At this point you only have an Ok button, but you want to have a cancel and OK button. To do this got to the end of the line of code in the messagebox and put two commas, with a string value after the first one as below:

MessageBox.Show("Is the value " & Text1.Text & "  Correct",  "User Check Value", ) 

After the last comma press the space bar and you should see a list of different options pop up. Pick MessageBoxButtons.OKCancel

If the user is happy with the value they have entered then you do not want to do anything, otherwise highlight the text so they can easily fix the value. proceed to assign the messagebox value to the variable you declared. The messagebox returns an integer value depending on the option picked (Yes/Cancel).

so your code will now look like:

MsgAnswer = MessageBox.Show("Is the value " & txt1.Text & "  Correct", "User Check Value", MessageBoxButtons.OKCancel)

And also add this IF statement:

If MsgAnswer = Windows.Forms.DialogResult.Cancel Then
            txt1.Focus() '
Sets focus to the text box
            txt1.SelectionStart = 0 '
Sets the selection to the start of the text box
            txt1.SelectionLength = txt1.Text.Length ' Selects the length = to the length of the text in the box
End If

So now if you run it you will see that if you press cancel on the message box it will highlight the text in the textbox and you can enter a new value. If you say OK it will not do anything.

This was just a simple exercise to show you how the messagebox value returned from user interaction can be use to do something else depending on the answer returned. As you are probably aware the scope of this is much larger than use it has been put to in this example.

Thursday, 4 March 2010

Using the IIF Statement


For those that aren't aware the definition 'IIF' may seem like a spelling mistake but VB uses a statement called the IIF statement to compare an input and return either of two values. It is, in effect, a shorthand was of doing:

If Value = condition THEN 
  Do Something here

ELSE
  Do something else
END IF

It is generally used for assigning values to variables or calling another routine rather than processing large pieces of code. The terminology is:

IIF(Input = (Value), Dothis, ElseDoThis)

And you can asign the value to something like on a form. So for example in VB create a form with a 2 text boxs and a label as below:


Text box 1 is the left box. The second text box is to give something you can tab to and fire the validate event.

On the form right click and pick view code. In the code window from the left drop down box you will see the text box name, pick this then in the right hand drop down list pick the event Validating. You will now see the following:


In this event put the following code:

lbl1.Text = IIf(txt1.Text = "Y", "Answer is Yes.", "Answer is no.")

Remember your label and textbox are usually called 'label1' etc but you can change this too what you prefer, I use lbl1 and txt1 as they are shorter to type. 

So with this code you are assigning to the label whatever the IIF statement evaluates every time you tab from the first text box to the next.

If you enter 'Y' the label will get assigned a string of text "Answer is Yes.", any other value and the label will get assigned to it the value "Answer is No."

Save your design and then run it. Put 'Y' in the box and then tab to the next text box and watch what gets put in the label.

If you want to make sure that an upper case 'Y' always gets put in, even if the input is a small case 'y' then you can do use the upper case function in the code:

lbl1.Text = (IIf(UCase(txt1.Text) = "Y", "Answer is Yes.", "Answer is no."))

This just means that anything you put in the textbox will be changed to upper case. This will then handle a user putting in both upper case and lower case 'Y' and 'N'.

Some other things you can do is go to the first text box's properties and change the maxlength value from 32k to 1. This will mean you can only put in a single value. This will help us as we do not need to code as much to check that only a single character value has been put in. As below, look at the highlighted portion in the properties window, bottom right:


Now you may wonder if there is an easier way of doing this rather than having a second text box to allow validating, which then runs the code because the code is in the validate event handler. Validating only works when you are exiting a control such as a text box so to run your code without having to leave the text box you can use the textChanged event instead of the validating event. You can see the code in the new event handler below:


If you are unsure how to pick a certain event then see here for picking from the drop down lists in the code window. Example shows picking form load event but the principle is the same. You pick the control from the left drop down and then the associated event from the right drop down, have a look at the screen shots to see how in the link. You can also delete the second text box as there's no need for it now.

Now that we have our code in the new event we want to try it out so save the project and then run it. Notice how only a 'y' or a  'Y' changes the answer to "Answer is Yes"?


Tuesday, 9 February 2010

Using Functions

In this post I am going to explain the fundamentals of a function in your code, how to pass parameters in the function and return values back to the calling code.

So you might have a bit of code where in part of that code you might want to check a certain condition before you continue, and to do this you may need to go to another class etc to check this. So you may have the following in a click button event for checking a name exists:


Dim fName as string ' Declare variable

fName = firstNameInput.text  ' Whatever the first name value is will be assigned to the fName variable for use in the function
Dim sName as String ' Declare variable
sName = surNameInput.text ' Whatever the last name value is will be assigned to the sName variable for use in the function
Dim Variable As String ' Declare variable
vCheckName = txtBox1.text Whatever is typed (Y/N) in the text box is then assigned to the variable

If vCheckName= "Y" Then ' When you click the button this will check if Y/N is put in the text box and call function

    If  Person.CallNameCheck(fName, sName) = True Then  ' Call this function with the variable values passed as the parameters to use to check if the person exists etc
         ' Do something
    Else
        ' Do something else
    End If
End If


Notice the code above saying:

Person.CallNameCheck(fName, sName) = True

In the Person class, which is where the function is you will find something like this:


Function CallNameCheck(varFName as String, varLName as string) As Boolean


' Code to gather information and check name goes in function and uses function parameters passed
' What would generally happen here is that the data where the names reside (DB or collection)
' would be gathered and looped through. If there was a name matching the one passed through
' the parameters of the function then something like a number count would be incremented
' and an If statement would determine if that number was more than 0 then True would be returned
' The if statement would be something like as follows:

If Count = 1 then
  CallNameCheck = True
Else
  CallNameCheck = False
End If

This would then return true or false to the original condition i.e. This part:


If vCheckName= "Y" Then '

    If  Person.CallNameCheck(fName, sName) = True Then  ' Check if True or False
         ' Do something if True is returned
    Else
        ' Do something else if False is returned
    End If
End If

If it was false then the code would go to the 'Else' statement, do whatever it has to do then exit out of the final IF statement.

This is basically what you use a function for.

Note: a function returns a certain value (True/False in this instance) to the calling statement whereas a procedure does not.

And also note that the function's parameter names can and usually do differ in the actual function itself to that, which is passed from the calling code. So in this case:

fName = varFName
sName = varLName

 It is simply because the variables used in the calling code use different named variables than that to the code where the function resides. These values (varFName, varLName) would maybe be used to be passed to a database procedure which would run and check the names against the values you passed.


Tuesday, 26 January 2010

Using Check Boxes

A check box is a simple control that allows the user to tick a box to mean they want a certain action performed. It is similar to thinking either true or false, or 1 or 0, and is actually used in this fashion in programming techniques.

When a checkbox is checked its CheckState property is set to 1 and when unchecked to 0.

If you want to have some code run when the checkbox CheckState is changed then you can use the following event:

CheckBox1_CheckStateChanged event.

In this event you can code for both a 1 and 0 event (Checked and Unchecked).

The CheckStateChanged event does not know itself what value the checkbox is at. all it knows is that it has changed. You have to read the properties of the checkbox to find that out. So if you wanted to do something depending on the state of the Checkbox (1, 0) you would maybe have an IF statement saying:

Note comments follow a single quote (')
---------------------------------------------------------
If CheckBox1.CheckState = 1 Then  ' Meaning it has been ticked
  'do something such as run a procedure or function etc
Else ' Can only mean the checkstate is otherwise 0
 ' Do some other operation
End If
---------------------------------------------------------

This code woul be in the CheckStateChanged event handler meaning that whenever the check state changes run the code inside the event handler. The full code is below:

Private Sub CheckBox1_CheckStateChanged(ByVal sender As Object, _
    ByVal e As System.EventArgs) Handles CheckBox1.CheckStateChanged

        
       If CheckBox1.CheckState = 1 Then  ' Meaning it has been ticked

           'do something such as run a procedure or function etc
      Else ' Can only mean the checkstate is otherwise 0

          ' Do some other operation
      End If
End Sub

Note:

Instead of using CheckBox1.CheckState = 1 you can also use:


CheckBox1.CheckState = CheckState.Checked

For 0 you can use:
  
CheckBox1.CheckState = CheckState.Unchecked

Which is the same as:
  
CheckBox1.CheckState = 0


This may seem slightly confusing and a pointless thing to have different notation meaning the same thing but it is essential to learn that these things exist in all code, and you have to learn how to spot them and understand what they mean.

Setting a Different Mouse Pointer

To use different mouse pointers such as a hand or a cross-hair when the cursor is moved over a control (Button for example) you simply set the Cursor property of the control that you want to see a different pointer on. So if you wanted to see a hand pointer on a button you would set the button's Cursor property and pick the pointer that you want to see when the mouse cursor is over that control.

Some designers like to do this as it gives a visual indication to the user that you can press the button, and when you move the cursor off the button it goes back to a simple pointer.

The default setting is a pointer on the form and on all the controls.

You can also set it programmatically by using the mouse enter event handler on a control such as a button as follows:

---------------------------------------------------------------
Private Sub btn2_MouseEnter(ByVal sender As Object, _
    ByVal e As System.EventArgs) Handles btn2.MouseEnter
        btn2.Cursor = Cursors.Hand
    End Sub
---------------------------------------------------------------

Pick the button from the drop down list at the top left in your code window and it will automatically populate the non-bold code above into your code editor window. You then put the code in, shown in bold above.

Monday, 25 January 2010

Restrict Drop-Down (Combo Box) Display Number of Items

If you are using a combo-box anywhere and you are populating it with say 30 or 40 items you might - due to size and design constraints - want to restrict the amount of initial items in the drop down box. First of all your combo-box would usually be set up with it's data when the form it is on loads.

You would use the form load event. If this is not showing in your code you can simply select it using the drop down lists at the top of your code window.

Pick (Form1 Events) in the left hand drop-down box (Form1 or whatever your form is called)
Pick Load from the right-hand drop-down box
The event handler code will then appear in your code listing like this:

See here for explanation of how to create form load event

Private Sub Form1_Load(ByVal sender As Object, ByVal e As System.EventArgs) Handles Me.Load
     
End Sub

In this handler you can put:

ComboBox1.MaxDropDownItems = 10

And it will look like this in the event handler:

Private Sub Form1_Load(ByVal sender As Object, ByVal e As System.EventArgs) Handles Me.Load
        ComboBox1.MaxDropDownItems = 10
End Sub

Meaning when the form loads the maximum amount of items the drop down will show out of your list of 30 or 40 will be 10.

Quite simple.

Tuesday, 5 January 2010

Create and Call Another Form


From one form you can call another form quite easily. In this demo you will learn how to simply call another form using a button on the main form.

So if you are not using any of the projects from the last example you can create a new form/project with a button on it. There are details to do this here:

To Create a new project

To Add a Form

So once you have done this, or you have opened an existing project you can play about with, do the following:

1) Pull a new button on to the form as shown:


Note: If you have the label control on the form from previous tutorials then remember to check that the button and lable do not line up. We are not going to be activating the label in this exercise but this is good practice to make sure controls don't clash.

2) Give it a text property like 'New Form' without the quotes of course

3) Give the name property a name like btn2

4) Add a new form to the project as below, Right click Project > pick Add > Windows Form:


5) After that you will get an 'Add new item' dialog box with the windows form icon greyed out.

6) All you need to do is keep the name as form2, or whatever is your default, and click add.

7) Once you have the new form, go to form1 designer view and double-click the new button

8) In this click event that you now see, put in the following code:

 Form2.Show() 

As you type form2. you will be given a list of options to pick from after the dot, if you type s then h after the dot you will see the word 'Show' in the list being matched to what you typed. To select this you can either doubleclick on it or press the tab key. This is shown below:


9) Now all you need to do is save and run the form, then click the new form button and you will see your new form. Simple enough.


Sunday, 3 January 2010

How to Use the Messagebox and Its Display Options

If you want to display an information or error message you can use either of two options in VB.NET:

1) MsgBox("My Message")

Or

2) Messagebox.Show("My Message", "Caption Information", Button Options, Icon Option, Default Button, Messagebox Options)

Generally you will only need a few of the options in the messagebox.Show(Options). All depending on what you want to do. I have only ever used the first three options but here is my explanation of the uses:

  • My Message = This is simply the message you want to display. The data type is string.
  • Caption Information = The information you want to display in the blue top bar of the message box. The data type is string.
  • Button Options = To get the button options put a comma after the caption and press space bar, a list of options will appear. These give you options for the types of buttons you want such "OK" only or "OK" and "Cancel" etc.
  • Icon Options = As before type a comma then space after the button options to give you the list of icons. you will have options such as information icon, error icon, exclamation, none, stop etc.
  • Default Button = This will allow you to select a default button if you have two or more buttons. 
  • Messagebox Options = This covers various options you will not be too concerned about if you are a beginner. I have not come across a time when I have used these options so feel it would be best not to go into this just now.

The first message box option (1) is carried over from VB6 and can be used in VB.NET as well. As far as I am aware it doesn't have the options available that messagebox.show has.

Lets show a messagebox on my experimental form. We will use a button to bring up the messagebox so you can simply use a new project or just a form as i am using for different exercises.

1) So if you open your  project (Or a new project) and place a button really anywhere on the form.

2) Click once on the button

3) Go to the properties of the button

4) Set the Text property to "Show Message box", without the quotes of course.

5) Expand the button design width so you can read the text on it

6) Double click on the button and you will get a button click event showing in the code as below


7) Put in this code:
    Messagebox.Show("My New Message")

8) Save the project

9) Run the project and click the new button "Show Message Box"

10) You should see the messagebox as below:


 As you can see there isn't much too it. Lets now add some more stuff to it to make it more interesting:

11) In you code add this:

MessageBox.Show("My New Message", "Show Message Box", MessageBoxButtons.OKCancel, MessageBoxIcon.Information)

Can you see what the new options are doing now?

12) Say you wanted to have a large message with breaks in the text you would use the following VB operator:

vbCrLf - Put this wherever you want a breakline in a message or string of text. You have to open and then close the quotes to put it in like this:

"I have a really long message " & vbCrLf &
"that I want to break into smaller " & vbClRf &
"lines so I use this technique"

The '&' is used to concatenate the strings together. The physical line breaks are only shown for illustration purposes. You could put all this code on one line. So here is how the message box looks now:


Remember to experiement with different options so you know what they do and how to use them.

Using 'With/End With' Statements

Instead of referencing the full name of a control for example we can use the With/End With statement. This allows us to reduce what we have to type if we anticipate that we will make many references to the control and it's routines.

The learning objective is to learn how and why the With/End With statement is used.

You might be referencing a textfield  in part of a statement as follows:

If Is Numeric(txtField.Text) Then
  txtField.Focus
  txtField.SelectionStart = 0
  txtField.SelectionLength = txtField.Text.Length
  Messagebox.Show("Value in text field must not be numeric.")
End If

But instead you could say:

With TxtField
If Is Numeric(.Text) Then
  .Focus
  .SelectionStart = 0
  .SelectionLength = .Text.Length
  Messagebox.Show("Value in text field must not be numeric.")
End If
End With

Notice how we do not need to reference the txtField now as we have said 'With TxtField'?

Can you see the dot (.) then the name such as Text, without the control's references i.e. TxtField? Because we have used the With statement we do not need to keep referring to the TxtField control.

This allows us to cut down significantly on the amount of typing we have to do when creating statements that refere to controls or other objects.

Saturday, 2 January 2010

Setting Focus and Highlighting Text

In the last post I talked about setting focus back to a field when a validation check had failed. Usually when the focus is reset to a field that the user tried to get out of the text is highlighted, usually to indicate something is wrong with it.

Remember the validation event is oly triggered when focus is lost in a field i.e. when the user tries to move on to the next field or exit. If the validation fails the focus has to be returned to the field with the incorrect data in it.

If you want to highlight the text in the field you can use this after you set focus:

txtField.SelectionStart = 0

This piece of code puts the cursor at the start of the field.

txtField.SelectionLength = txtField.Text.Length


This piece of code sets the length of selection as the length of the text in the field, so it only selects that text and no more.

Validating

Validation is just a check for a certain piece of information and it usually done when focus is lost from a field. It is a critical part of any design as the cornerstone of most designs consists of information being placed into a database through these forms, and the data has to be in the correct format before it goes in. Generally there are validation checks being carried out in the Database but it can be helpful to catch any problems before this point within the application design.

For instance you may check that an email address has the '@' in it and say a certain prefix of yahoo, hotmail, google, netmail or any other web based email providers.

So for instance if you wanted to check if an email had the '@' symbol in it then in a validation event for the email field you would say:

If InStr(txtEmail.Text, "@") = 0 Then

MsgBox("The email must include the '@' symbol. " )

End if

The InStr operator checks 'In the String' for the value and the parameters you put in brackets are the (txtemail.text) field, and then what you want to find in the string i.e. the '@' symbol.

If the '@' value wasn't present then you would want to return the focus to the field until the value does include a '@' symbol. Within the code you would set the focus to the field if the check failed. This would return the user to that field until the check passed. If you did not do this then the user could move on and leave an unvalid value in the field. So the code would look like this:


If InStr(txtEmail.Text, "@") = 0 Then

MsgBox("The email must include the '@' symbol. " )
txtEmail.Focus()

End if

InStr returns a numeric value so if the value is 0 then this means the '@' symbol wasn't found.

You can do any checks at validation, this example is only one type of check.

Window State

When you run an application you may have a start up form and other forms that are called from this form. When you open any form you can have it set to open at maximum size, minimum size or normal, normal is the button you see in Windows at the top right of the screen, between the 'x' and underscore '_' .

If you want to set your form to be a certain size when you run the application, you set the property WindowState in the properties to the size you want : Minimised, Normal, or Maximised.

You can also set this at runtime wherever you choose. The code would look like this:

Me.WindowState = FormWindowState.Maximized

or if you were calling this routine from somewhere other than the form itself

form.WindowState = FormWindowState.Maximized

The form being the name of the form you are trying to change the size of.


Tab Order

What is tab order? Well if you go on to a web site or form, anything with controls (Buttons, Labels, Textboxes, combo boxes etc), and hit the tab key a few times you will see the focus moving through the different controls. For instance if you are logging in to a website you put in your user name then hit tab, this takes you to the next field for the password. In this case the tab order of the password field would come directly after the user name field.

Tab order is generally in number format and it is quite important to consider this when building a form with lots of controls. This tab order is part of the safety net that the user does not even realise is there. You may want a user to go through a form in a certain way so they do not miss information or processes that are needed to be carried out such as username then password in that order.

It's quite simple really, all you need to do to set tab order is click on each control in turn and set the tab order to reflect the tab movement that you want. The property is listed as tabindex and most controls will have a tab order. Anything that the user has to interact with will have a tab order property.

If there are controls that you do not want to be included in the tab order than just make the value much higher than the set of controls you have in the tab order. for instance you may want to exclude a critical button from a tab order, this is because a user can inadvertantly set focus and hit the return button, which will then activate a process you only wanted to be activated with the mouse.

The tab index will be set in the sequence of the order of the control that you put on the form, you may want to change this as you do your development work however.

Tab order can depend on many things, you may want to eliminate tabbing on buttons and only allow mouse clicks on them. this may be the case in a bank form where you transfer money by clicking a certain button. You wouldn't want the user to accidentally hit return after creating focus on that button with the tabbing key. Using the mouse makes the user think about what they are doing more than tabbing and hitting return to activate a button etc.

Generally speaking many people do not use tabbing and use the mouse to click in fields and on buttons, however commerical users and people who work with computers daily will generally be more accustomed to tabbing and it has to be built into any computer programme to handle this type of usage.

Thursday, 31 December 2009

Change Label Width Dynamically

Ok so in the last exercise we clicked the button on the form, this then:

1) Calculated the form size at that moment
2) Set the label size to be in the form with equal distance between the start and end of the label with repsect to the form edges.
3) Wrapped the text to fit.

Now the limitation was that if you moved the form's width with your mouse the label width would stay the same and so you wouldn't see the ends of the wrapped text as you decreased the form width.

1) To make this a dynamic setting take the code from the button click event and copy it to a text editor (Word, Notepad etc).
2) Delete the code
3) Go to the code window and in the top left drop down menu pick (frm1 events)
4) In the right hand drop down pick the resize event
5) In the event handler for the resize event paste the code you copied from the button click event.
6) Take out (cut) the line where you populate the label and paste it into the button click event.
7) Save and run the application

So your click event should only have this code in it:

lbl1.Text = "I am populating the label with some text now.... and I am typing more text here to increase the width of the string beyond the width of the screen. This is to show how the label can be wrapped so that it does not print off the screen."

Your resize event should have this code in it:


Can you see in the very last line of code that a new drawing size is being created and put in the lbl1.maximumsize property? The variable value we used in the original formwidth variable will change as we change the form width

When you run it you should be able to decrease the width of the form and the label text will now shrink or increase to fit, the text line breaks will increase or decrease depending on the width of the form. It will get to a point where, if you are decreasing the width of the form to such as extent, the height of the form, which is fixed, will not be able to expand to contain all the text and it will be pushed out the bottom of the form.

Label Being Decreased to Small Width (Note the label text wrapping to fit). Any smaller than this width and the text will start to be pushed off the bottom of the form.


Label Being Increased to Large Width(Note the label text increasing to fit):


What usually happens is a form will have many controls on it and the designer will want to contain the amount the user can decrease the width. We could stipulate a minimum size for the width so that it never went below this. Height will usually be static.

Wrapping Text in a Label

Previously I showed you how to dynamically increase a form's width to take into account a control size being increased - such as the label - to hold a longer string of text. We discussed that this had a limitation that if the string font was very large (unlikely) or the string was very long then the string would write off the page if the length of the control (label stretching with long string in it) and the distance from the label to the left of the form was longer than the PC screen itself.

A solution to this is to tell the code to wrap the text in the label if it gets to the end of the screen maximum [determined] size and still needs to write out more of the string. What you can also do is set a size limit for the label and have it wrap when it gets to that size. This is the more likely option that would be used so lets do that.

Please note any old code will be commented out and a space left between it and new code I am writing. If you see code commented out just ignore it and concentrate on the work being done at present.

So what assumptions can be made?

1) The form will not get any bigger than the physical screen size
2) We can limit the size of the label width and then wrap to accommodate more text.
3) The operation will still be triggered by the button click event for now.
4) We may make a routine that can be called from the click event to calculate the length of text etc in further tutorials

So let us do the following:

  • Set an arbritary maximum size for the width of the label
  • Set the code up so that it wraps the text if the length of text string dictates it.
  • Set label property 'AutoSize' to True
1) Let us first comment out the code we have from previous exercises to leave us with just the string of text (in button click event) being put into the label as follows:

lbl1.Text = "I am populating the label with some text now.... and I am typing more text here to increase the width of the string beyond the width of the screen. This is to show how the label can be wrapped so that it does not print off the screen."

Note: I have put in extra text so that the text is much longer than the current form size.

The current form is:

Size = 526, 300

And it will be kept at that for now.

2) Go to the design window for the form. Pull the label over to the left under the button so that both left sides of the button and label are aligned. You will see a blue reference line when they are in line. See screenshot for example:


3) When you run the application then click the button it will calculate the form size at that time and create a label that will fit into it with equal space either side. The code to do this is in the screenshot below:


Please note that some of the code is commented out and some of the previous code I was able to reuse for this exercise. All the code is in the button click event. This will only work for the click event but it lets you see a simple way of wrapping the text in the label to fit a predetermined size i.e. the fixed form size. Remember the text you have to put into the label as above. Here it is again:

lbl1.Text = "I am populating the label with some text now.... and I am typing more text here to increase the width of the string beyond the width of the screen. This is to show how the label can be wrapped so that it does not print off the screen."

Putting this code in the button click event is only for illustration purposes so you can associate what happens through clicking a button. In reality this code would be part of a routine called at maybe different intervals throughout the operation of the code.

For instance if someone was resizing the form then the width would have to be continually recalculated and the label width recalcualted to fit in the moving formsize. Just try resizing the form width now and see what happens to the text.

So check out the next posting if you want to see how to have the label automatically resize as you increase and decrease the width of the form. It's much easier than you think. The hint is you do not need to write any more code, just add a new event handler and do some tweaking.

Wednesday, 30 December 2009

Remeber Your Comments

When you are coding remember to put in comments to explain what your code is doing. This fulfills the following:

1) Anyone else reading your code can get a quick plain English overview of what is happening without the need to study the code.

2) It helps you to document what you have done and by doing this you might notice a mistake you have in the logic of your code through explaining it in plain English

As you can see I have added a list of explanations as to what the code is doing in the screenshot below. The comments are the lines in green:


Remember to put the comments in the appropriate place, don't just list them all at the top of the class. Put comments about a click event in the click event and so on.

Increase Form Size Automatically to Fit Text

You might have a situation with a form where you need to automatically expand it to fit in an expanding label or other controls that vary in size. Sometimes large text strings are put in a wrapping (onto another line below) label but nevertheless this is an interesting bit of work to try as the fundamentals of it can be put too good use in other tasks.

The learning objective here is to learn how to calculate the new size of the form and then apply it. So for instance if I increased the font size in my label it would print of the edge of the form because it is not big enough to fit in the existing form size.

1) So with the previous example lets create a new font size for the message we have put into the label by doing this in the button click event before assigning the text to the label:

lbl1.Font = New Font(Font.FontFamily, 30)

So you are declaring a new font object and assigning it the value of 30. The current value will be whatver the setting is in the properties of the label in the design editor; in this case it is 8.25.

As you can see in the screen shot I have inserted the new line of code before we put in the text to the label.


Run this to see for yourself that the text runs right off the side of the form.

2) Create three variables to:

  • Hold the width of the label once it has been populated with text
  • Hold the X position of the label. This will tell you how far the left side of the label is from the left edge of the form.
  • Hold the new form width required. This will be the addition (+) of the two previous variables.

So in your code, just after the event handler code for the button click event declare the new variables as follows:

Dim labelWidth As Integer
Dim LblLocationX As Integer
Dim newFormWidth As Integer

Don't worry about the names too much as long as they tell you what the variable's purpose is. They should be declared as integers because all the values we will be dealing with are integers, and the value being input to the 3rd variable wil also be an integer because it will be the addition of the two first variables.

So as you can see in the screenshot below the variables are now defined. You will get a green squiggly line under the variables and if you hold your mouse to the line it will tell you this is an unused local variable. Do not worry however as you are going to be using then in a minute. This is not anything to worry about.


3) Put the label width in to the variable labelWidth as follows:

labelWidth = lbl1.Width

4) Put the X coordinate label location in the labelLocationX variable as follows:

LblLocationX = lbl1.Location.X

5) Add the two variables (+) you have just populated with values and put the sum of these values into the variable newFormWidth as follows:

newFormWidth = LblLocationX + labelWidth

Just to remind you what you are doing here is you are taking the measurement from the left of the form to the start of the label, you are then taking the label width (when it has the text in it) and then adding these two values. This will give you the new required width of your form to accommodate the large font that has written of the page.

Technically speaking the left side of the form is fixed and all controls on the form will reference from the left side of the form. If the form has to resize then the measurement from the left of the control (label or textbox for instance) to the left of the form can be used as a fixed reference to calculate the new form size required with respect to the increased size of the control you need to accommodate.

6) As you are in the form class, to refer to the form, and to set its width to the new size you type the following:

Me.Width = newFormWidth

7) Save your changes and run the form. You will see the form jump to a size just neat enough to accommodate the new longer label size when you hit the button.

The good thing here is if you move the label a bit further away from the left side where it originally was it will always recalculate and resize your form according to the position of the label. There is however one slight limitation - can you spot it? Answers at the bottom of the page.

Here is a screenshot of the finished product:

Before label expands:


You can see the label expands here to accommodate the increased length of the label:


So did you figure out the limitation? If you increase the text font ot such a large size that the length of the string is physically bigger than the computer's screen width then it will write off the page. As far as I know there is no simple way to make the form bigger than the screen, I think it is a Windows limitation rather than VB itself. However I will look into this and post a topic if I find out how it is done.

Generally speaking you wouldn't generally find text that big on a form. But if the text string is going to be long then it is probably better to wrap the text in the label. I will post a quick thread on how to do this soon.

Populate Label With Text

So lets populate this label with some text. We know it is going to be clear for us to put in a value as the label is cleared when the form loads. What we need to do is to use the existing btn1 click event and put some code in there. We will use the code as before but with one difference, can you spot it?

lbl1.Text = "I am populating the label with some text now...."

So lets go and put this into the button click event. You can see the new code in the click event and the resulting form at runtime, after we click the button, in the shot below: